Why downlight spacing matters
Get the spacing wrong and downlights can make a room feel patchy, gloomy or full of glare. Get it right and you get clean, even light with no obvious “hot spots” on the floor or dark corners on the ceiling.
Because downlights are fixed into the ceiling, it’s worth taking five minutes to plan the layout before you buy frames and cut any holes.
At Spot Downlights we specialise only in ceiling downlight frames and fittings – GU10, MR16 and MR11 – so this guide is focused on helping you place those fittings in the right places.
Quick answer: simple rules of thumb
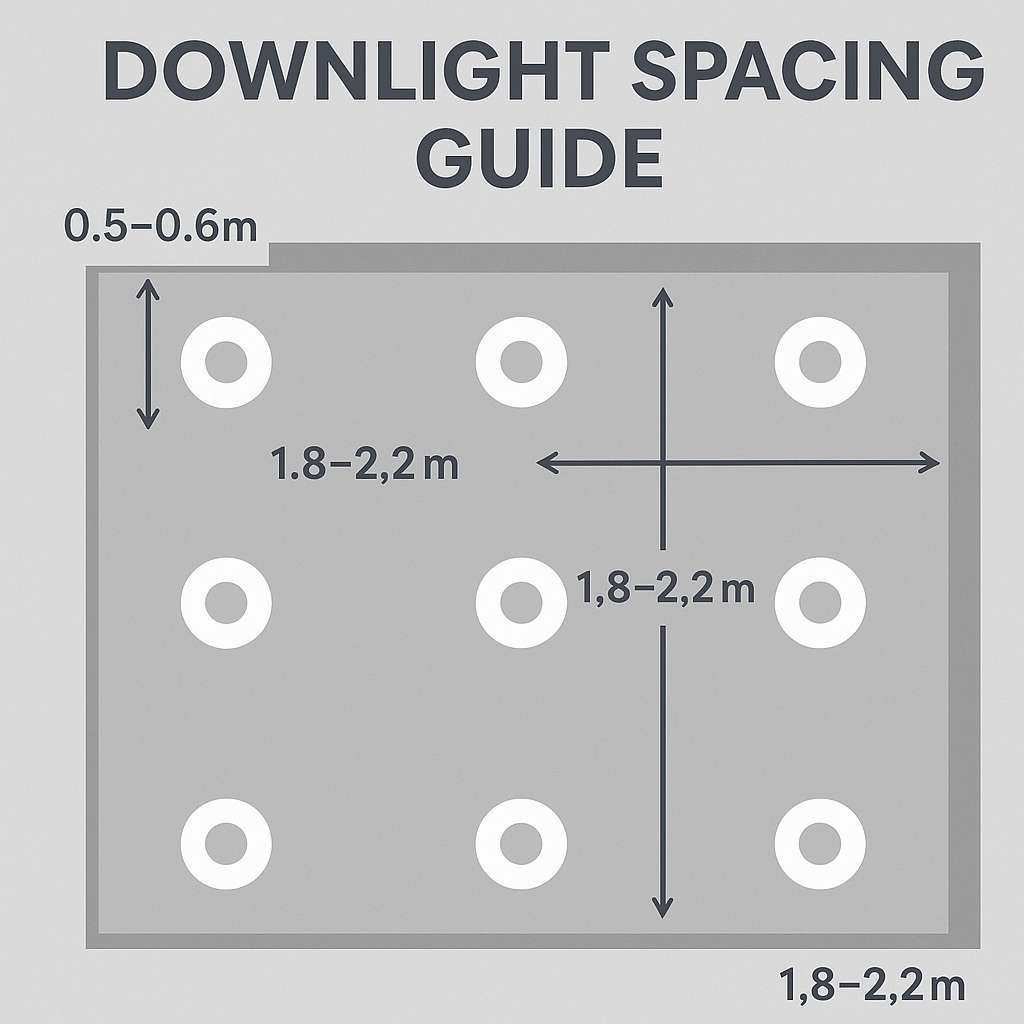
Here are two easy starting points you can use together:
- 1) Spacing = around 1–1.2 × ceiling height
- 2.3–2.4 m ceiling → spacing of around 2.2–2.7 m between rows.
- Keep fittings at least 0.5–0.6 m from each wall so you don’t get scallops or dark stripes.
- 2) Roughly one downlight per 1–1.5 m²
- 3 × 3 m room (9 m²) → 6–9 downlights as a sensible range.
- 4 × 3 m room (12 m²) → 8–12 downlights.
These are starting points, not rigid rules. Bathrooms, kitchens and worktops usually benefit from slightly more light and tighter spacing than bedrooms or sitting rooms.
Always check your plan with a qualified electrician – especially when you’re combining downlights with other light sources or dimming.
Step-by-step: planning your downlight layout
1. Measure the room and ceiling height
Write down:
- Room length and width (in metres)
- Ceiling height
- Any areas you want to avoid (ceiling joists, beams, extractor fans, attic hatch, etc.)
Multiply length × width to get the floor area in m².
2. Decide how bright you want the room
As a rough guide:
- General living areas (bedrooms, lounges, hallways)
→ aim for the lower end of the range (around 1 downlight per 1.2–1.5 m²). - Kitchens and bathrooms
→ aim for the higher end (around 1 downlight per 1.0–1.2 m²).
Even if you’re only buying frames from us and choosing lamps separately, decide early whether you want bright task lighting, soft ambient lighting, or both with dimming.
3. Work out a starting quantity
Example – 3 × 4 m kitchen (12 m²), 2.4 m ceiling:
- Area: 12 m²
- Target density: 1 downlight per 1–1.2 m²
- Quantity: 10–12 downlights
You might start with 10 as a sensible middle point.
4. Sketch a simple grid
Draw the room as a rectangle on paper and:
- Mark a border of 0.5–0.6 m from each wall.
- Arrange your estimated number of fittings inside that border in a loose grid.
- Aim for spacing of around 1.8–2.2 m between fittings in each direction for a 2.3–2.4 m ceiling.
You won’t always get perfect numbers – the goal is even, regular spacing that looks tidy and avoids fittings landing right on top of a cupboard, extractor fan or ceiling joint.
Example layouts
Small bathroom (2 × 2.5 m, 2.3 m ceiling)
- Area: 5 m²
- Quantity: aim for 4–6 downlights
- Layout idea:
- 4 downlights in a neat rectangle, 0.6 m from each wall.
- Add a 5th if you want a little more light near the shower or basin (respecting zones and IP ratings).
For bathroom-specific advice on IP44/IP65 and zones, see our full guide:
Bathroom downlights IP44 vs IP65 and zones explained.
Kitchen (3 × 4 m with worktops on two sides)
- Area: 12 m²
- Quantity: 10–12 downlights
- Layout idea:
- Two or three rows running across the short side of the room.
- One row positioned slightly in front of the worktop edge, so the beam hits the worktop rather than your head.
- Keep at least 0.6 m clearance from cabinet fronts and walls.
Common mistakes to avoid
1. Putting fittings too close to walls
Fittings right up against a wall can create harsh light scallops and emphasise any imperfections in plaster or paint.
- Keep frames at least 0.5–0.6 m away from walls.
- For feature walls you want to wash with light, use dedicated wall-wash spacing, not general downlight spacing.
2. Random spacing around obstacles
It’s normal to move one or two downlights to avoid joists, fans or pipes – but if you don’t rebalance the layout, the result looks messy.
- When you shift one fitting, check the rest of the row.
- Try to keep visually consistent lines when you look across the ceiling.
3. Forgetting bathroom zones and IP ratings
Over a shower or bath you may need IP44 or IP65 fittings depending on height and zone. Always:
- Choose frames and lamps suited to the correct IP rating.
- Follow your electrician’s guidance and UK wiring regulations.
Again, our dedicated bathroom guide explains this in detail:
Bathroom downlights IP44 vs IP65 and zones explained.
Choosing frames and finishes to match your layout
Once you’re happy with your layout and quantity, it’s time to pick the actual fittings.
At Spot Downlights we focus only on ceiling downlight frames and fittings, so you can match the style and finish to the room:
- IP-rated bathroom downlights for showers and wet areas
→ e.g. black, white and chrome IP44/IP65 options. - Standard fixed frames for bedrooms, lounges and hallways.
- Fire-rated options where required by building regulations or as recommended by your electrician.
Browse our current range of ceiling downlight frames and fittings here:
Shop ceiling downlights
You can mix different finishes (for example, black over a dark island and white in the rest of the kitchen) as long as the spacing and alignment stay consistent.
Final checklist before you order
Before you buy frames and cut any holes, quickly run through this checklist:
- I’ve measured the room and noted the ceiling height.
- I’ve used 1–1.5 m² per downlight as a starting point.
- Fittings are 0.5–0.6 m from walls, with even spacing across the ceiling.
- I’ve allowed for extractor fans, beams, hatches and pipe runs.
- For bathrooms, I’ve checked zones and IP ratings with my electrician.
- I’ve chosen frames (finish, IP rating, fire-rating) that match each room.
If you’re planning a project and not sure which frames to choose, feel free to plan your spacing first and then match it with our specialist downlight frames and fittings – designed around how UK electricians actually install and use them.